How to send bulk emails in Outlook without hurting your reputation
How to send bulk emails in Outlook is one of the most searched questions for teams that already live in Microsoft 365. You can use Outlook mail merge or BCC for small batches, or connect the same Outlook mailbox to FreeEmailSender with an app password so campaigns send as individual messages through your Outlook SMTP account.
This guide covers native Outlook methods, Microsoft 365 sending limits you must respect, and a full FreeEmailSender path: create your account, generate an Outlook app password, add a sender account, import a CSV, and send bulk email while staying inside provider quotas.
Choose the right Outlook method for your list size
How to send bulk emails in Outlook depends on volume and personalization. For a few dozen contacts with unique names or fields, mail merge is usually fine. For a tiny internal announcement, BCC can work if every recipient already expects mail from you. For larger permission-based lists that need templates and analytics, connect Outlook to FreeEmailSender instead of pasting everyone into one message.
Do not paste hundreds of addresses into the To field. That exposes every address to every recipient and looks unprofessional. Prefer individual messages—via merge or a campaign tool that sends one message per recipient through your Outlook SMTP account.
| Method | Best for | Personalization | Main risk |
|---|---|---|---|
| Mail merge | Dozens to low hundreds | Strong (name, fields) | Microsoft 365 send limits |
| BCC | Very small known groups | Weak | Privacy mistakes; spam filters |
| FreeEmailSender + Outlook SMTP | Larger permission lists | Strong via CSV fields | Still bound by M365 / Outlook quotas |
| Distribution list | Internal or managed groups | Limited | Not ideal for marketing |
Method 1: Outlook mail merge for personalized bulk email
Mail merge is a solid native answer to how to send bulk emails in Outlook when each person should get an individual message. Prepare a clean Excel or CSV list with an Email column and optional fields such as FirstName or Company. In Word, start a mail merge email message, connect the list, insert merge fields, then finish by sending through Outlook.
Before the full run, send a test to yourself and one colleague. Confirm the From name, subject, merge fields, links and signature. Remove empty rows and invalid addresses first so you do not waste limited Microsoft 365 send capacity on failures.
- Build a permission-based contact file with an Email header
- Write a clear subject that matches the message content
- Insert merge fields instead of hard-coding names
- Preview several records before completing the merge
- Send a small test batch, then the remaining list within daily limits
Method 2: BCC for tiny known audiences only
BCC can be part of how to send bulk emails in Outlook for a handful of recipients who should not see one another’s addresses. Put your own address in To, add recipients in BCC, and keep the message short and expected.
BCC does not scale. Large BCC lists often trigger spam filters, hit recipient caps, and make it hard to track who received what. Never use BCC to hide a purchased or scraped list.
Method 3: Send bulk emails with FreeEmailSender using your Outlook account
A practical way to learn how to send bulk emails in Outlook at campaign scale is to keep Outlook as the sending identity and let FreeEmailSender handle CSV import, HTML templates, personalization, paced SMTP delivery and analytics. Messages still leave through your authorized Outlook or Microsoft 365 mailbox—so Microsoft’s limits still apply.
Follow the setup sequence below: FreeEmailSender account → Microsoft app password → Outlook sender account → campaign send. Do not use your normal Outlook login password in third-party tools when an app password is required.
Step A: Create your FreeEmailSender account
Sign up at FreeEmailSender and verify access to the dashboard. New accounts can try a small free send allowance so you can validate the Outlook connection before paying for a larger campaign. Plans and pay-per-email pricing apply after the trial according to the current checkout screen.
You will need an Outlook, Hotmail, or Microsoft 365 mailbox you own or are authorized to use. Connecting someone else’s mailbox without permission violates the terms and can lock the account.
- Create and sign in to FreeEmailSender
- Open Sender accounts (delivery settings)
- Keep your Microsoft account recovery options up to date before creating an app password
Step B: Set up a Microsoft Outlook app password
Most Microsoft consumer accounts block ordinary passwords in SMTP clients. An app password is a separate, revocable key used only for apps like FreeEmailSender, so your main Outlook password stays private.
Typical path for a personal Microsoft account: Microsoft Account → Security → Advanced security options → App passwords → create a new app password and copy it once. Turn on two-step verification first if Microsoft requires it before app passwords appear. For work or school Microsoft 365 mailboxes, an admin may need to allow authenticated SMTP and app passwords or an equivalent SMTP AUTH method—ask IT if the option is missing.
- Enable two-step verification on the Microsoft account when prompted
- Create an app password labeled for FreeEmailSender or Mail
- Store it temporarily; you will paste it into the sender account form
- Revoke the app password later from Microsoft Security if you stop using the tool
Step C: Create an Outlook sender account in FreeEmailSender
In FreeEmailSender, open Sender accounts and add a new sender. Enter a display name, your Outlook email address, and the app password—not your everyday Microsoft password. For Outlook.com and Hotmail, FreeEmailSender commonly uses SMTP host smtp.office365.com on port 587 with STARTTLS (secure connection as shown in the form). Many Microsoft 365 business domains use the same host when SMTP AUTH is enabled.
Save the sender account, then run the built-in connection test. Credentials are stored AES-256 encrypted and are not returned to the browser after saving. If verification fails, re-check the app password, confirm SMTP AUTH is allowed for the mailbox, and ensure you have not hit a temporary Microsoft block from earlier bulk attempts.
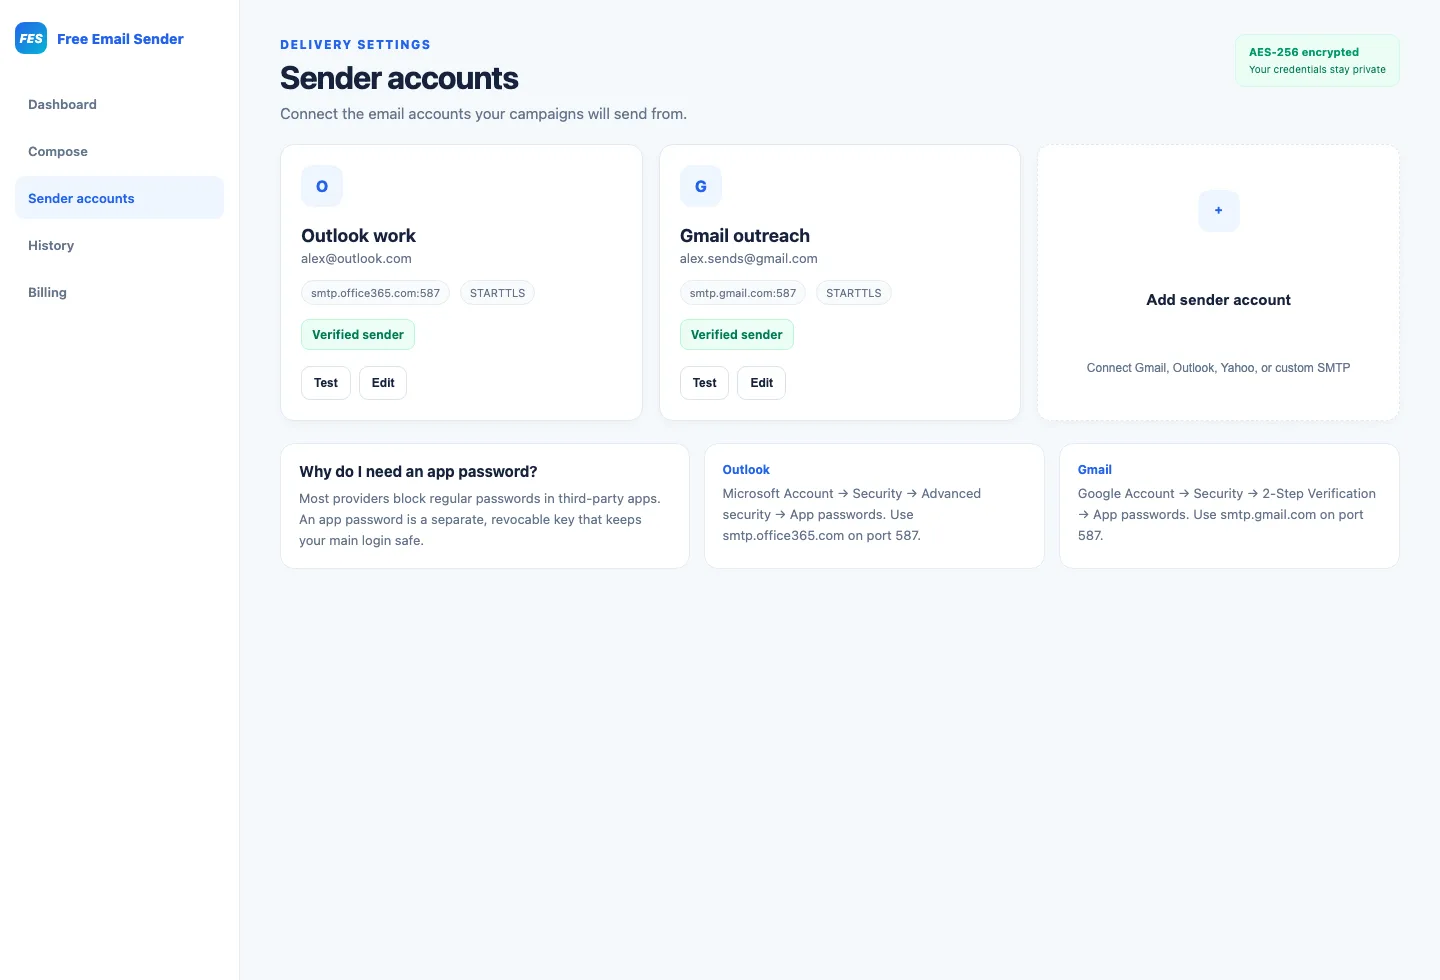
| Setting | Common value | Notes |
|---|---|---|
| [email protected] or [email protected] | Must match the mailbox you authorize | |
| SMTP server | smtp.office365.com | Used for Outlook.com / Hotmail presets |
| Port | 587 | STARTTLS / secure as shown in the app |
| Password | Microsoft app password | Not your normal login password |
Step D: Import your list and send the bulk campaign
Prepare a permission-based CSV or Excel file with an email column and optional personalization fields. In FreeEmailSender, import the file, review validation and duplicates, choose your verified Outlook sender account, customize an HTML template or paste your message, then preview and send a test to yourself.
At checkout, use trial capacity, pay-per-email ($0.001 per recipient from 500 onward) or a monthly plan. After launch, monitor sent, failed and unique open reporting. If Microsoft throttles the mailbox, pause, reduce pace or split the campaign across days so you respect Microsoft 365 limits.
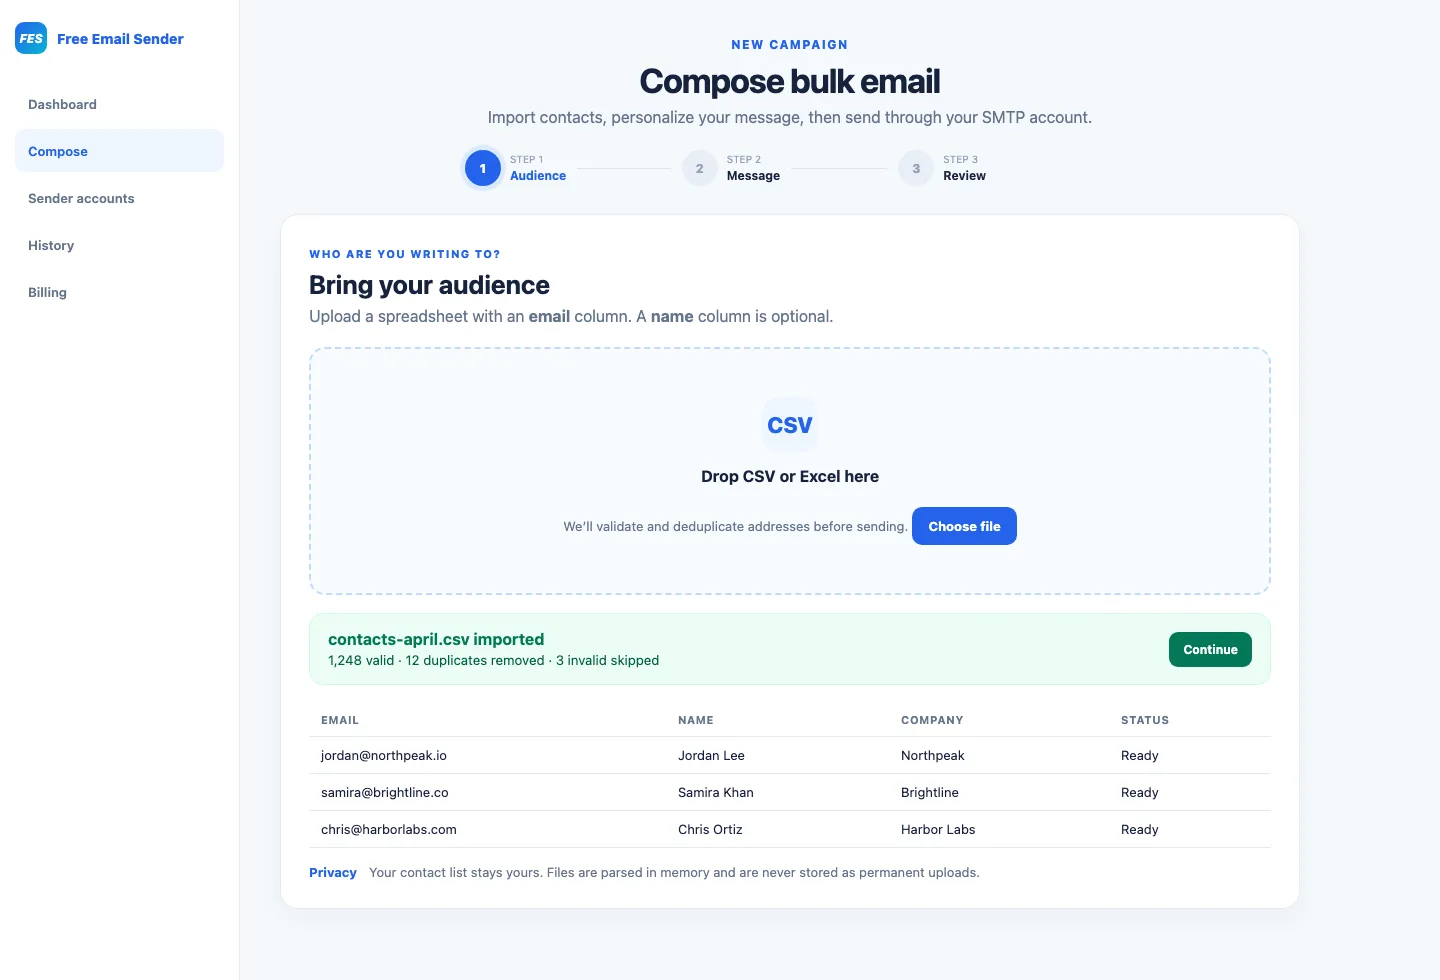
- Import only contacts who expect your mail
- Select the verified Outlook sender account before checkout
- Send a test message through the same Outlook SMTP path
- Watch failure reasons; fix invalid addresses instead of endless retries
- Split large lists across days when near Microsoft daily caps
Respect Microsoft 365 and Outlook sending limits
Whether you use mail merge or FreeEmailSender, how to send bulk emails in Outlook always means respecting Microsoft’s ceilings. Microsoft 365 Exchange Online and Outlook.com restrict recipients per day, messages per minute, and sometimes external recipients. Tenant admins can set stricter policies. FreeEmailSender cannot raise those caps.
If a campaign or merge fails midway, pause and check for throttling, blocked senders, disabled SMTP AUTH, or authentication errors. Repeatedly retrying permanent failures wastes quota and damages reputation. Clean invalid addresses, lower concurrency or daily volume, and resume only when the mailbox is healthy again.
| Situation | What to do | Why |
|---|---|---|
| Near daily recipient cap | Pause and continue next day | Avoid mailbox lockouts |
| Burst of temporary failures | Slow pace; retry later | Likely throttling |
| Permanent invalid address | Remove from list | Protects reputation and quota |
| SMTP AUTH disabled | Ask admin to enable or use another authorized mailbox | Connection will keep failing |
| App password rejected | Create a new app password; confirm 2-step verification | Old keys may be revoked |
- Read current Microsoft 365 Exchange Online and Outlook.com sending-limit documentation for your account type
- Ask your admin whether SMTP AUTH is enabled for the mailbox
- Warm up new sending patterns; do not jump from 10 to 10,000 messages in one hour
- Keep marketing volume within daily recipient limits—split multi-day sends if needed
- Authenticate custom domains with SPF, DKIM and DMARC where you control DNS
- Stop immediately if Microsoft returns rate-limit or blocked-send errors
Write bulk messages Outlook recipients will trust
Technical steps for how to send bulk emails in Outlook fail if the content looks like spam. Use a recognizable display name, an honest subject line, a short reason for writing, and one clear call to action. Include a way to opt out of future marketing messages where required.
Avoid misleading urgency, excessive punctuation, and image-only emails. If you attach files, keep them small and expected. For cold or first-touch outreach, prefer individualized wording over a heavy HTML blast.
Checklist: how to send bulk emails in Outlook safely
Use this checklist before every batch so how to send bulk emails in Outlook stays controlled—whether you merge in Outlook or send through FreeEmailSender with your Outlook account.
- Permission-based list only; no scraped or purchased contacts
- Clean Email column; remove duplicates and blanks
- For campaigns: FreeEmailSender account + Microsoft app password + verified Outlook sender
- Test to yourself through the same Outlook SMTP path
- Stay under Microsoft 365 / Outlook recipient and daily limits
- Split large sends across days when approaching caps
- Monitor bounce or failure patterns and stop if blocked
- Revoke app passwords you no longer need
Frequently asked questions
How to send bulk emails in Outlook with personalization?
Use Word or Outlook mail merge for small lists, or connect Outlook to FreeEmailSender with an app password, import a CSV with name fields, and send individualized messages through Outlook SMTP.
Do I need an app password to use Outlook with FreeEmailSender?
Usually yes for personal Microsoft accounts. Create an app password under Microsoft Account Security and paste it when adding the Outlook sender account. Work or school accounts may need admin-enabled SMTP AUTH.
Can I send mass email from Outlook with BCC?
Only for very small groups of people who expect the message. Large BCC sends are unreliable, hard to track, and more likely to hit spam filters or Microsoft 365 limits.
Does FreeEmailSender bypass Microsoft 365 sending limits?
No. When you send through an Outlook or Microsoft 365 SMTP account, Microsoft’s recipient, rate and policy limits still apply. Pace campaigns and split volume across days when needed.
How do I create an Outlook sender account in FreeEmailSender?
Open Sender accounts, enter your Outlook email, SMTP settings (commonly smtp.office365.com port 587), and your Microsoft app password, then run the connection test before launching a campaign.
Sources and further reading
Related Free Email Sender guides and official product, pricing, policy, or methodology pages reviewed for this article. Features and prices can change, so confirm current terms before making a decision.